Visitors

Sunday, June 12, 2011

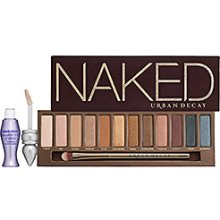
Naked Palette Tutorial

Yay another tutorial is up on my beauty channel, this time is all about Urban Decay Naked Palette. This is what I would usually pull together on days where I am in a rush, or when I am heading to work. Is simple and it can be done within 5 minutes, often times when we get ready for work we always use browns cause is on the save zone. But we get bored of browns sometimes and is hard to use colors and still keeping it appropriate. Here I am using a lot of bronze and champagne color, these colors complement each other. Using these colors right can replace your old boring brown shadow look into something with more sparkle and life. You don't need to use the products that I used, whatever you have that has a bronze tone to it will work. Make sure is not copper tone, copper tone is too intense unless that's what you are looking for. Anyhow enjoy the tutorial and like I mentioned in my videos, I got a huge product review coming up so stay in tune for that.
I feel like every time I mention that a lot of tutorials and videos are coming up, but they never get up for a long time. I do actually have a lot of things plan out, new series that I am doing and filming. But I only have one body and 24 hours a day, sometimes is just really hard to catch up with work, family and friends while trying to edit videos, film and upload. For those that don't know me, I got standards if the footage didn't turn out nice, I am not using it. So I go back to square one and try to re film, than the last thing you know I used up the whole day to re film.
Anyhow enough of me talking lets just enjoy the video and i will see you all very soon.

Check out my other tutorial (NYC Individual Eye Palette):

Cheri
xoxo

Sunday, June 5, 2011

Sonia Kashuk Blending Sponge Review/Product Comparison

This post is exclusive to my blog no video what so ever on this topic. Originally this topic was meant for a video and I actually did film. However I decided to make this exclusive to my blog (since I have been neglecting it pretty bad)

Not too long ago I did a haul showing the stuff I got from my one day trip to the states. Some of you may have saw this little blue thing, that I got from target. This little blue thing is the Sonia Kashuk Blending Sponge. I know tons of people done review on this sponge but I thought I will put in my 2 cent, cause everyone is different. To make it different from others, I am also going to compare this sponge here with 3 other commonly used foundation application tools.

Lets start off the review with some general information. As most of you have seen on blogs or YouTube, this sponge is probably compared mostly to the pink egg shaped sponge "the Beauty Blender." The Sonia Kashuk Sponge is a more affordable alternative to the Beauty Blender. The concept of both the sponges is the same, they are both design and created for smooth application of foundation. Have you ever came across the problem of getting streak marks when applying foundation? Well with this sponge you wont get that problem, because of the way is shaped. The design is the secret weapon, the sponge is round which doesn't give off any edges and thats what makes streak marks. No Edges=No Streak Marks :)
SK Blending Sponge doesn't exactly resemble an egg shape but is very similar. I
prefer the design of the SK Sponge more. You get a pointy tip which is better for
areas that's harder to reach (like around your nose and under the eye area) Than going to the bottom is round and has a larger area to work with, which is great for your forehead and the cheek area. What you don't get with the beauty blender is the curve in the middle, and is what makes SK Special. The curve in the middle is why I prefer SK than to Beauty Blender. This curve allows a better hold and control of the sponge, when working in areas around the nose.

The concept like I mentioned earlier is the same, they both created for multiple uses to create flawless application of foundation. You can use it wet or dry for powder, cream or liquid products. Let me save you some money by saying this: if you are going to use this sponge dry for liquid products just don't get it. Yes it does work but what you are going to find is, it uses way too much of your foundation. Waste of money and the true potential of the sponge. Another tip is use it Wet instead of Dam the material is unlike regular sponges is more durable. When is only Dam it doesn't absorb enough liquid to prevent absorption of your foundation. After every uses you must wash the sponge, bacteria harvest faster on sponge like material especially if is wet. You don't need any special type of cleanser to clean it, baby shampoo will do the trick. By this point some of you may be thinking how long will this sponge last?
Well that depends on how frequently you use the sponge for application of foundation. The more frequent you use it (like everyday basis) you probably find your sponge breaking down at 2 months time.
Fact: This sponge takes ridiculous amount of time to dry, no matter what I try to cut down the time. The result is the same, it will take a minimum of 1 and a half day to dry. Yep I know thats long, so if are going to use this sponge everyday I suggesting getting 2.

Time for comparison, first on the list "sponge wedges" as far as material and texture is probably the most similar to the SK Sponge. Although the material is very similar, when it comes to application is very different. The Wedges will give out streak marks when blending since there's edges. However the streak marks are very minimal which is acceptable for me. One thing I noticed was with the wedges it is a lot easier to tell how much product you are applying on unlike the SK Sponge. I like it personally to see and know how much product you are applying on to your face. You are less likely to apply too much foundation, which prevents you from looking cakey. Thats one of the biggest issue I have with the SK Sponge, everything else is good to me. Choosing one over the other is extremely easy for this product, I will go with the wedges. Cause I can see how much product is going on my FACE!!!

Second on the list is a brush and is the "classic foundation brush" We are talking about application tools for foundation and this brush right here is specifically made for applying foundation so lets see how it turns out. First thing you notice when using the brush is STREAK MARKS, is way too obvious to ignore it. One thing you can do to try preventing streak marks is to apply foundation in a criss crossing motion. But half the time that is ineffective just saying, so you will definitely need more time to blend out the foundation to give it a flawless texture. When comparing this to SK Sponge, I think I prefer the Sponge over the brush just because the amount of time you need to spend on blending.

Third but not least is another brush and this one is "the skunk brush or the duo fiber brush or the stippling brush" whatever you want to call it :) The application of this brush compared to the SK Sponge is the most similar and I probably would say is identical. The coverage it gives off and the texture is identical. The coverage that you get from both product is light but not sheer, the effect you get is like airbrush. Both product is hard to tell how much product you are putting on your face, but I have to say the brush is just a tag easier to tell. Overall these 2 are very similar and I wouldn't know which to favor over.

After 3 comparison which one do I favor the most? Is it the SK Sponge or the Wedges or the Classic Foundation Brush or the Skunk Brush. Hmmm I have to go with the wedges is a hard one because I do like the skunk brush but I prefer the coverage that the wedges gives. Also I consider the fact that wedges can be found in any drug store in a huge pack of 30. As for the SK is only available in Target so if you don't have a Target around your area you pretty much cant get it.

*Price: SK Sponge $10 CAD / Wedges(pack of 30-32) $2-3 CAD
Just looking at the price the wedges is actually more affordable than the SK Sponge. A pack of wedges usually comes with 30-32, you are only paying max 3 bucks for wedges each month. Costing $36 year round, for SK Sponge usually start breaking down in 2 months. Costing $60 year round and that doesn't even include your backup sponge. So which means you are saving a total of $24 yearly if you decided to go with wedges.

Is harder to compare the prices with brushes, since you can get brushes at different price range from $16-$34. But if you take good care of your brushes, your most likely going to end up using the same brush for up to 2 years or more. So at the end you are saving more on brushes than to the sponge.

Would I get this again? Probably not is not like is a bad product but I can definitely find products that can do the same if not better. Hope this review/comparison helps :)
Thanks for Reading and also remember to check out my YouTube Channel

Cheri
xoxo

Wednesday, June 1, 2011

May Favorites & Review/Tutorial

Super late on updating this blog, I apologize. Lately YouTube has been taking over most of my time, filming & editing and getting it to upload (which takes for ages). Usually I update my blog right after my video is uploaded, and lately my videos are up like at mid night or 2 in the morning. So I just head to bed and the next day I just forget and thats horrible. But anyways to make up for my absence, here is 2 videos all in one post. They were actually uploaded very close to each other, i think it was a day apart only.

Anyways one is a review/ tutorial on the NYC Individual Eye Palette For Brown Eyes, I got requested to do a tutorial on this palette in April by one of my viewers. However when that happened, I was in Hong Kong which I didn't have the Palette with me so nothing could be done at that point. Therefore after a long wait of coming back home and settling down and figuring how my new camera works. I finally have this tutorial up, and I decided to throw in a review (is short but is to the point)

My latest video is of course my monthly favorites, this month is actually my first video monthly favorites. All along I have done my monthly favorites on my blog right here. Sometimes I actually like doing my monthly favorites on my blog cause I can give a little review on the product. More in depth than what I can do on YouTube since there is a time frame. So I decided from next month on I will also do a specific post for my favorites describing why I love the product. That way I don't have to try rushing all the information into one video and usually that doesn't turn out too good.

Here's the links to my videos


Don't forget to subscribe and comment :)
Thanks for reading see you all very soon.

Cheri
xoxo

Tuesday, May 24, 2011

Road Trip To The States

For those in Canada hoped you had a wonderful long weekend, cause I sure did and did LOTS of SHOPPING!!!! My family decided to take a short road trip down to the states and do some shopping. So we headed down to the Outlet in Seattle and stop by Target, Walmart & Sally Beauty Supply along the way. Of course I had to buy cosmetic oh and you can't forget about the ICE CREAM! Aside from the Ice Cream that I wont be showing you in this video, everything else from foundation to organizational things I will be showing you.

For swatches of products that I mentioned in this or previous videos please visit my Facebook Page for pictures. My Facebook Page from now on will be the place for swatches.

Hope you enjoy this video and I will see you all very soon :)

Facebook Page:
Haul Video:

Cheri
XoXo


Saturday, May 21, 2011

Open Box Review: Naked Palette

Yay I am super excited for this....I finally got my Naked Palette from Urban Decay. I brought this Palette off Sephora 2 weeks ago, and it arrived yesterday. However I wasn't at home to receive it therefore, I had to pick it up at the post office. If you don't know what the Nake Palette is than you are missing out a lot. Contains 12 shades of neutral eyeshadow, if you are the type of girl that loves to wear very neutral colors than GET THIS. However is extremely hard to get your hands on this palette because is so popular that the stock is very tight. Don't worry ladies this is a permanent palette so if you cant get this now you will be able to later on.

If you visit the Sephora Stores here in Vancouver, BC the chances are you probably wont be able to find them. Most stores I visited actually don't display the palette out anymore, if you really want this I suggest watching it online instead of in stores. Also check with the Urban Decay's own Webpage for more info on stocks. Thats the best way to know if they will have the Palette Back in stock anytime soon.

Winner of my GIVEAWAY
I already chose the winner for my giveaway and I already message the winner through blog spot. Congrats to chanchararan, please check your inbox!

Enjoy my short but sweet open box review on the Naked Palette. For Swatches of the Palette visit my Facebook Page.

Video
Don't Forget to Comment, Subscribe and Rate.

Facebook

Cheri
xoxo

Wednesday, May 18, 2011

TUTORIAL TIME :)

For ages I have been trying to film a tutorial and is finally up. So what a better way to kick off the start of my tutorial is to do a series, using Naked Cosmetic Pigments. This is the look that I will pull together when I reach for the Cabernet Blush roll, is natural enough for a color look which you can wear to work.

I am slowly trying to update my blog and YouTube regularly starting from now on. I will at least try to put up 2 videos per week and I will start to throw in some vlog and tag videos. I love watching those cause you get to know that person a little better and is also fun to film :)

You can expect a vlog coming up very soon since I will be heading to the states :) Road Trip Time with my family. Hope I get some interesting footage and maybe I will even do a haul.

Anyhow if you were all wondering about the giveaway, it ends today at 11:59 PM (Pacific Time) I will do a draw right at midnight and post the winner on my blog and YouTube on Thurs May 19th. Good Luck to everyone :)

If you would like to enter the very last min here is the blog post to enter
http://letsglamup.blogspot.com/2011/05/giveaway-entries.html

My Tutorial
http://www.youtube.com/watch?v=IUznv__nmQc&feature=feedu

Cheri
xoxo

Friday, May 13, 2011

My Skin Care & Nail Polish Haul

Its been awhile since I posted an actual video and I know I promised all of you my skin care and nail polish haul. So I gathered everything and took an hour to film this over and over again, until is good enough for me to show all of you. After I spend the whole night editing and this morning I did some final touches and is now ready to show the world :) They were right is like a full time job with doing YouTube Videos, you wouldn't get it until you actually experience it. Although the procedure of uploading a video is very time consuming but I love it.

Anyhow Here is the Link to the Video: (Don't Forget to Comment & Subscribe)

Giveaway Update:
There has been some changes to the rules and the closing date. So please read carefully before entering.

The closing date for this giveaway has been extended, due to blogger maintenance that occurred. My blog was not working for 2 days therefore none can comment or view my blog. So I am extending it to May 18 at 11:59 PDT (VANCOUVER,CANADA TIME)

Just to clear some confusion, I will say it again in this post. You do have to become one of my follower on my blog AND subscribe to my YouTube Channel. There is a button "FOLLOW" located on my blog,just below "My Supporters" you must click that and sign into whichever account best suit you. This will enable me to see your username and for me to cross reference it to your entry comment. If you do not do that I cannot enter you to the giveaway draw, because there's now way for me to check which follower you are.

Also please enter your blog username and your YouTube Username, because I noticed that some usernames does not correspond to what I see on the follower list on my blog. It will be much easier for me to check and contact you if you are selected as the winner.

If you are interested in entering the giveaway please only submit your comment entry on my GIVEAWAY ENTRIES blog post.