Visitors

Monday, January 31, 2011

BB Cream

Yes it finally arrived after 2 weeks of long and painful waiting. Let me introduce to you the new addition to my collection "Skin 79 Super Beblesh Balm in Hot Pink." This product claims to be a triple function B.B cream, it whitens, eliminate wrinkles and contains SPF to protect against UV rays. Now I don't know about the whole whitening or wrinkles eliminating thing, but for sure it will protect me from UV rays. I will have to use it more to say anything about that, I will sure do a full review on this B.B cream.


What I think of it so far?
Color- looks to be a pale peach sorta color, definitely have more of a pink undertone to it. Not sure how that color would work on my face since I have more yellow tones than pinks. It does oxidize to a more visible peach color (sorta like a flesh color that you get out of coloring pencils)

Picture: it doesn't really do the color justice (it almost look as if is a pale white,but in person is a lot more pink)

Feel- It has a very soft silky texture, feels very light on the skin. However I noticed that it dries to a powder type finish, and it feels a little dry. It almost seems like is not as moisturizing as when you first applied it.

Coverage- Don't expect B.B cream would give you foundation like coverage it wont. B.B Cream is meant to be a light to light-medium coverage. Is nice to wear alone on those that have flawless skin or minor discoloration and acne scars. For those that have more problem areas, this probably will just act as a base for your foundation.

Picture: (Left)The color is more concentrated, not totally blend out yet. The B.B cream covered up the tiny blood vessels on my hand and some of the redness.

Stay tune for a more in-depth review on the B.B cream soon.
Also stay tune for "Brushes 101" featuring Sigma Brushes up next. :)

Cheri
xoxo

Sunday, January 30, 2011

"All Things Brows" Part 2

Part 1 was all about grooming our brows, now lets talk about "How to defining the brows." After grooming your brows you should have a nice shape to work with. One thing to remember when defining your brows is to follow your natural brow shape. Avoid drawing on a whole different shape this will defeat the purpose of grooming your brows.
There are numerous products that you can use to define your brows with:

Pencil: There are pencils specifically created for the eyebrows, when you pick out your pencil there are a few things to keep in mind. Pick a shade that is close to
your natural hair, avoid the color that has a grey or black tones. Depending on what setting you will be using your pencil, you can pick a pencil with water proof formula.

Advantage: there are varieties of pencil you can pick, is also a more inexpensive option.
Disadvantage: Pencils are hard to control at first you will need time to practice to get it right. Pencil products tend to not last as long as say a brow powder.
My Recommendation: NYX Eyebrow/Eyeliner Pencil ($5.99)or NYX Eyebrow Pencil with build in Brush($5.99)

Powder: Second most common product used for the brows, you can buy these products either in drugstore or at Sephora. These powders are actually eyeshadow, you can use any brown eyeshadow you own. Keep the shadows matte avoid anything that has shimmer or glitter. Again avoid any shade that has a grey or black tone, you want to keep your brows as natural as possible.

Advantage: they are the easiest to use and will look the most natural. It will last for along time because you only need to use a little.
Disadvantage: they are more prone to loosing the color intensity through out the day, touch up may be required.
My Recommendation: Anastasia Brow Ex-press Kit (includes 2 brow powders, 4 stencils great for starters, angle brush, a cream highlighter to lift the eye brows & a wax to hold the shape) $19

Lets Look at the steps on defining our brows:
Tools you need: Spooley or eyebrow brush, your powder or pencil (optional-eyebrow gel or clear mascara)

Step 1- Use your Brow brush or in my case a spooley to brush through the eyebrows at least once. This will help you see the shape of your brows better.


Step 2- Take your pencil or powder apply light strokes at the inner corner (where your brows starts) The darkest part should start
here and the color should fade out to the end. The purpose of defining the brow is to fill in sparse area. If you have semi full brows to begin with, you don't have to fill it in as much. Remember to keep the natural shape of your brows, do not over draw.
(Tip: Fill your brows from the bottom instead of the top, this will look more natural)


Step 3- Take your clean fingers now blend the product out, going in the direction of how your hair is grown. This will soften the color out and will make your brows appear more natural.


Step 4- Take your Brow brush or spooley and brush through the brows again to put it back in place. If you need to apply more color you can do so and repeat the process. At this point you can use a brow gel or clear mascara to keep your brows in place. Now you have perfectly define brows to frame your eyes and face.


This is the end to the "All About Brows" series, thank you for reading and supporting my blog. I know is probably a lot easier to do a video tutorial instead, I am working towards a youtube channel however is going to take longer than I expected.

Leave your comments below on your thoughts and other than reviews and tutorials what else would you like to see. Leave your request down below and I will get back to you soon.

Cheri
xoxo

Saturday, January 29, 2011

Request: "All Things Brows" Part 1

This is for you my lovely couz :)
I am not an expert on Brows, I tend to stay away from defining my brows just because it looks too harsh for me. But since it was a request I thought i will give it a shot, so lets kick it off with "How to Groom Your Brows."

Grooming: This is tricky because when is done right it can really work to your advantage and frame your beautiful eyes and make them pop. If not it can look hideous and you would do anything to get your brows back. If you are just starting out,here is my advice: spend that extra money to get your brows groom professionally at least once, especially if is your first time. Trust me you wont regret it, professional
knows what brows shape complement your face. Also is cuts down the amount of work to maintain the brows later on. I fix up my brows at least twice per week, mainly to maintain it's shape and get rid of any little hairs in the middle.
I use 2 tools to maintain my brows aside from my tweezers i also use brows razor.

Here's a quick guide on how to maintain/shaping your brows:

Step 1- Take a pencil or chopstick and line it vertically beside your noise. This should create a straight line and point to the start of your brows. Any hair beyond that point should be removed.


Step 2- Take the pencil or chopstick and keep it beside your noise (touching) at all time. Move the pencil until it hits the center of your pupil this is where your arch should be. At this point you can remove any hair to form your arch or remove any hair to maintain the perfect point for the arch. (Avoid removing hair from the top of the brow this can ruin the shape very easily)

Step 3- Take the pencil or chopstick and now move it to the tip of your eye. This is where your eye brows should end. Any hair beyond that point can be removed, also you can remove any hair around the lid area to have a cleaner appearance.


Well here is part 1 of the "All Things Brows" hope it was helpful, comment below on how the picture looks and if you like this format. What would you like to see on the blog next, put your request down below in the comment box. Thanks for supporting means a lot to me, stay tune for part 2 coming up tomorrow.

Love Cheri

Review: Nars Duo Eyeshadow "Sugarland"


Today NARS Duo Eyeshadow "Sugerland" is up for judgement. First off I have to say I never imagine myself even trying out NARS eyeshadow. I guess it wasn't the first brand that came in mind on what i wanted to try. I was given this product to me as a holiday gift and after i did a lot of research and looked at tons of reviews so i know what to expect. Nars are really famous for their blushes however their eyeshadow are either a hit or a miss.... unfortunately this duo falls under the "Miss" Category. Well at least for me it did, since a lot of review gave it a thumbs up.

My Rating For this Product: 3 out of 5 cherries

Here is Why i didn't Like it.....

(Before i start torturing this product let me give a thumb up for something i liked)

Thumbs up:
-Sleek Compact: I love the design of the compact is tiny not bulky at all which is great if you are on the go. Slip it in your purse and you are ready to go.

-Study: I like my products to be sturdy is very important especially when you are always on the run or doing makeup for a client. You really don't have the privilege to take your time to open and close a product with care, the snap shut system on this compact is extremely easy to shut which is nice. What i enjoy the most about it is the material they used, it has this soft texture but it still grabs on to your hand ensuring it wont slide off and fall onto the ground.

Thumbs Down:
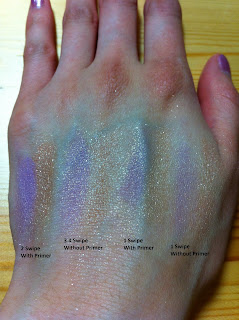
- Pigmentation: One of the biggest issue about this duo is the color pay off...it just didn't do it for me. It really failed me because i was expecting so much more pigmentation in these shadows for what is worth. I feel like part of the reason why it doesn't show on me is my skin tone, i do have medium skin tone. Below is a picture of swatches...On the far right side is 1 swipe of the shadow with no primer and on its left is 1 swipe with a primer. You can slightly see a difference but is still extremely sheer. On the far left is 2 swipes of shadow with a primer as a base, here you can truly get the color you see in the pan. On the right of it is 3-4 swipes with out a primer and here you can tell a major difference to the color intensity, between the one with and with out a primer.
Overall if you want to get a true color you need to pack on a few layers of shadows, but be careful you will get tons of fall out. Also i recommend using a primer for this duo since it has a lot of fall out and shimmer.
-Coloring: This is really more of a personal issue since i do have medium skin tone. The purple in this duo looks very pretty however when is transfer onto my eyes, it gives the illusion that my eyes are puffy. The Apricot color is too sheer, glittery and causes too many fall out to even use as a highlight color. Overall this duo colors doesn't flatter me at all.

Hope you find this review helpful and stay tune for more reviews, tutorial and much more.
Cheri